
Hello there, guys! In this post, I will walk you step by step on how to implement multi-authentication using Laravel and ReactJS. I have also done a post on how to make a CRUD application using Laravel and ReactJS. You may also want to check it out. Without further ado, let’s begin.
Step 1:
Install React App
npx create-react-app laravelreact-app
cd laravelreact-app
npm start
Step 2:
Set the Components Files For Login and Register
In this step, we will set the components files as follows create a folder frontend/auth then create these two files
frontend/auth/Login.js and frontend/auth/Register.js. After creating the two files update them with the following code
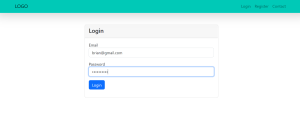
components/frontend/auth/Login.js
import React, {useState} from 'react';
import axios from 'axios';
import swal from 'sweetalert';
import {useHistory } from 'react-router-dom';
function Login() {
const history = useHistory();
const [loginInput, setLogin] = useState({
email: '',
password: '',
error_list: [],
});
const handleInput = (e) => {
e.persist();
setLogin({...loginInput, [e.target.name]: e.target.value });
}
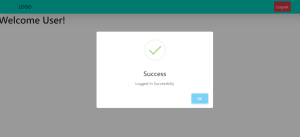
const loginSubmit = (e) => {
e.preventDefault();
const data = {
email: loginInput.email,
password: loginInput.password,
}
axios.get('/sanctum/csrf-cookie').then(response => {
axios.post(`api/login`, data).then(res => {
if(res.data.status === 200)
{
localStorage.setItem('auth_token', res.data.token);
localStorage.setItem('auth_name', res.data.username);
swal("Success", res.data.message,"success");
if(res.data.role === 'admin')
{
history.push('/admin/dashboard');
}
else
{
history.push('/dashboard');
}
}
else if(res.data.status === 401)
{
swal("Warning", res.data.message,"warning");
}
else
{
setLogin({...loginInput, error_list: res.data.validation_errors });
}
});
});
}
return (
<div>
<div className="container py-5">
<div className="row justify-content-center">
<div className="col-md-6">
<div className="card">
<div className="card-header">
<h4>Login</h4>
</div>
<div className="card-body">
<form onSubmit={loginSubmit}>
<div className="form-group mb-3">
<label>Email</label>
<input type="email" name="email" onChange={handleInput} value={loginInput.email} className="form-control" />
<span>{loginInput.error_list.email}</span>
</div>
<div className="form-group mb-3">
<label>Password</label>
<input type="password" name="password" onChange={handleInput} value={loginInput.password} className="form-control" />
<span>{loginInput.error_list.password}</span>
</div>
<div className="form-group mb-3">
<button type="submit" className="btn btn-primary">Login</button>
</div>
</form>
</div>
</div>
</div>
</div>
</div>
</div>
);
}
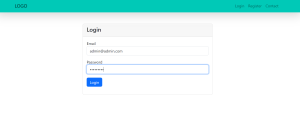
export default Login;The form has two input fields for the user’s email and password, and a submit button. When the user submits the form, the loginSubmit function is called, which sends a request to the server to authenticate the user’s credentials. If the authentication is successful, the user is redirected to the appropriate page based on their role (admin or regular user). If there are any errors, they are displayed in the corresponding input fields.
components/frontend/auth/Register.js
import React, { useState } from 'react';
import axios from 'axios';
import swal from 'sweetalert';
import {useHistory } from 'react-router-dom';

function Register() {

const Navigate = useHistory();
const [registerInput, setRegister] = useState({
name: '',
email: '',
password: '',
error_list: [],
});

const handleInput = (e) => {
e.persist();
setRegister({...registerInput, [e.target.name]: e.target.value });
}

const registerSubmit = (e) => {
e.preventDefault();

const data = {
name: registerInput.name,
email: registerInput.email,
password: registerInput.password,
}

axios.get('/sanctum/csrf-cookie').then(response => {
axios.post(`/api/register`, data).then(res => {
if(res.data.status === 200)
{
localStorage.setItem('auth_token', res.data.token);
localStorage.setItem('auth_name', res.data.username);
swal("Success",res.data.message,"success");
Navigate('/dashboard');
}
else
{
setRegister({...registerInput, error_list: res.data.validation_errors});
}
});
});
}

return (
<div>
<div className="container py-5">
<div className="row justify-content-center">
<div className="col-md-6">
<div className="card">
<div className="card-header">
<h4>Register</h4>
</div>
<div className="card-body">
<form onSubmit={registerSubmit}>
<div className="form-group mb-3">
<label>Name</label>
<input type="text" name="name" onChange={handleInput} value={registerInput.name} className="form-control" />
<span>{registerInput.error_list.name}</span>
</div>
<div className="form-group mb-3">
<label>Email</label>
<input type="text" name="email" onChange={handleInput} value={registerInput.email} className="form-control" />
<span>{registerInput.error_list.email}</span>
</div>
<div className="form-group mb-3">
<label>Password</label>
<input type="password" name="password" onChange={handleInput} value={registerInput.password} className="form-control" />
<span>{registerInput.error_list.password}</span>
</div>
<div className="form-group mb-3">
<button type="submit" className="btn btn-primary">Register</button>
</div>
</form>
</div>
</div>
</div>
</div>
</div>
</div>
);
}

export default Register;
The form has three input fields for the user’s name, email, and password, and a submit button. When the user submits the form, the registerSubmit function is called, which sends a request to the server to register the user’s information. If the registration is successful, the user is logged in and redirected to the dashboard page. If there are any errors, they are displayed in the corresponding input fields.
Step 3:
Set the Home Page
Create this file as follows components/frontend/Home.js and update it with this code
components/frontend/Home.js
Home.js
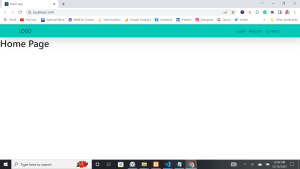
function Home() {
return (
<div>
<h1>Home Page</h1>
</div>
)
}

export default Home;
This code defines a ReactJS functional component called Home. The component simply renders a heading saying “Home Page”. The export statement at the end of the code allows the component to be used in other parts of the application. When the component is rendered, it will display the “Home Page” heading on the page.
Step 4:
Create an assets file for some styling.
assets/frontend/css/styles.css
.bg{

background: #00c9b7 !important;
-webkit-box-shadow: 5px 9px 43px 1px rgba(0,0,0,0.18);
box-shadow: 5px 9px 43px 1px rgba(0,0,0,0.18);
position: sticky;
top: 0px;
z-index: 10;
}
This is just for styling the Navbar. Let’s create the Navbar itself.
Step 5:
To create a folder with the name layouts. The path should be as follows layouts/frontend/Navbar.js
layouts/frontend/Navbar.js
Update the file with this code
import React from 'react';
import {Link, useHistory} from 'react-router-dom';

import swal from 'sweetalert';
import axios from 'axios';

function Navbar() {

const history = useHistory();
const logoutSubmit = (e) => {
e.preventDefault();

axios.post(`/api/logout`).then(res => {
if(res.data.status === 200)
{
localStorage.removeItem('auth_token');
localStorage.removeItem('auth_name');
swal("Success",res.data.message,"success");
history.push('/');
}
});

}

var AuthButtons = '';
if(!localStorage.getItem('auth_token'))
{
AuthButtons = (
<ul className="navbar-nav">
<li className="nav-item">
<Link className="nav-link" to="/login">Login</Link>
</li>
<li className="nav-item">
<Link className="nav-link" to="/register">Register</Link>
</li>
<li className="nav-item">
<Link className="nav-link" to="/contact">Contact</Link>
</li>
</ul>
);
}
else
{
AuthButtons = (
<li className="nav-item">
<button type="button" onClick={logoutSubmit} className="nav-link btn btn-danger btn-sm text-white">Logout</button>
</li>
);
}

return (
<nav className="navbar navbar-expand-lg navbar-light bg">
<div className="container">

<Link className="navbar-brand" to="/">LOGO</Link>

<button className="navbar-toggler" type="button" data-bs-toggle="collapse" data-bs-target="#navbarSupportedContent" aria-controls="navbarSupportedContent" aria-expanded="false" aria-label="Toggle navigation">
<span className="navbar-toggler-icon"></span>
</button>

<div className="collapse navbar-collapse" id="navbarSupportedContent">
<ul className="navbar-nav ms-auto mb-2 mb-lg-0">
{AuthButtons}
</ul>
</div>
</div>
</nav>
);
}

export default Navbar;
This code defines a ReactJS functional component called Navbar. The component is a navigation bar that appears at the top of the page. It has two links: “LOGO” and “Contact”. If the user is logged in, the “Logout” button is displayed instead of the “Login” and “Register” links.
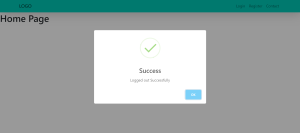
When the user clicks the “Logout” button, the logoutSubmit function is called, which sends a request to the server to log out the user. If the logout is successful, the user is redirected to the homepage and their authentication token is removed from local storage. The export statement at the end of the code allows the component to be used in other parts of the application.
Step 6:
A Dashboard For Normal Users.
layouts/frontend/Dashboard.js
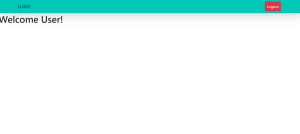
function Dashboard() {
return (
<div>
<h1>Welcome User!</h1>
</div>
)
}

export default Dashboard;
This code defines a ReactJS functional component called Dashboard. The component is a page that is displayed to a logged-in user who is not an admin. The page simply displays a greeting message saying “Welcome User!”. The export statement at the end of the code allows the component to be used in other parts of the application. When the component is rendered, it will display the “Welcome User!” heading on the page.
Step 7:
Now we need a FrontendLayout to handle our routes from the frontend and this is how it’s going to look like
layouts/frontend/FrontendLayout.js
import React from 'react';
import {Route, Switch} from 'react-router-dom';
import Navbar from '../../layouts/frontend/Navbar';
import '../../assets/frontend/css/styles.css';

import Dashboard from '../../layouts/frontend/Dashboard';

import Publicroutes from '../../routes/Publicroutes';

import 'bootstrap/dist/css/bootstrap.min.css';
import 'bootstrap/dist/js/bootstrap.bundle.js';

const FrontendLayout = () => {

return (
<div>

<Navbar />

<div>
<Switch>
<Route path="/dashboard" component = {Dashboard} />

{Publicroutes.map((routedata, idx) => {
return (
routedata.component && (
<Route
key={idx}
path={routedata.path}
exact={routedata.exact}
name={routedata.name}
render={(props) => (
<routedata.component {...props} />
)}
/>
)
)
})}
</Switch>
</div>

</div>
);

}

export default FrontendLayout;
This code defines a ReactJS functional component called FrontendLayout. The component is the main layout for the frontend section of the application. It includes the Navbar component at the top of the page and a Switch component that renders different pages based on the URL path. The pages that can be rendered include the Dashboard page for logged-in users and the pages defined in the Publicroutes array.
The Publicroutes array contains information about the different public routes that are available in the application, such as the login and register pages. The export statement at the end of the code allows the component to be used in other parts of the application. When the component is rendered, it will display the navigation bar and the appropriate page based on the URL path.
Step 8:
Create these files for the public.
routes/Publicroutes.js
import Home from '../components/frontend/Home';
import Page403 from '../components/PageErrors/Page403';
import Page404 from '../components/PageErrors/Page404';
import Register from '../components/frontend/auth/Register';
import Login from '../components/frontend/auth/Login';


const publicRoutes = [
{ path: '/', exact: true, name: 'Home', component: Home },
{ path: '/403', exact: true, name: 'Page403', component: Page403 },
{ path: '/404', exact: true, name: 'Page404', component: Page404 },
{ path: '/login', exact: true, name: 'Login', component: Login },
{ path: '/register', exact: true, name: 'Register', component: Register },
];

export default publicRoutes;
This code defines an array of route objects, each with a path, exact flag, name, and a component to render for that route. This array of routes is then exported and can be used by a router to render the appropriate component for a given URL path. For example, if the router matches the path '/', it will render the Home component. If it matches the path '/404', it will render the Page404 component.
Step 9:
403 and 404 Page Errors
components/PageErrors/Page403.js
import React from 'react';

function Page403() {
return(
<div className="container">
<div className="d-flex align-items-center justify-content-center vh-100">
<div className="text-center">
<h1 className="display-1 fw-bold">403</h1>
<p className="fs-3"> <span className="text-danger">Opps!</span> Forbidden.</p>
<p className="lead">
You do not have admin rights.
</p>
<a href="/" className="btn btn-primary">Go Home</a>
</div>
</div>
</div>
);
}

export default Page403;
This code defines a Page403 component, which is a functional React component that returns a div containing a message indicating that the user does not have permission to access the requested page. The message is displayed using various CSS classes to style the text and layout. The component also includes a link to the home page. When this component is rendered by a React app, it will show a page with the forbidden message and a link to the home page. When the user clicks the link, the app will navigate to the home page.
and for 404 as follows…
components/PageErrors/Page404.js
import React from 'react';

function Page404() {
return (
<div className="container">
<div className="d-flex align-items-center justify-content-center vh-100">
<div className="text-center">
<h1 className="display-1 fw-bold">404</h1>
<p className="fs-3"> <span className="text-danger">Opps!</span> Page not found.</p>
<p className="lead">
The page you’re looking for doesn’t exist.
</p>
<a href="/" className="btn btn-primary">Go Home</a>
</div>
</div>
</div>
);
}

export default Page404;
This code defines a Page404 component, which is a functional React component that returns a div containing a message indicating that the requested page could not be found. The message is displayed using various CSS classes to style the text and layout. The component also includes a link to the home page. When this component is rendered by a React app, it will show a page with the “page not found” message and a link to the home page. When the user clicks the link, the app will navigate to the home page.
Step 10:
Create a PublicRoute For FrontendLayout
src/PublicRoute.js
import React from 'react';
import {Route} from 'react-router-dom';
import FrontendLayout from './layouts/frontend/FrontendLayout';

function PublicRoute({...rest})
{
return (
<Route {...rest} render={ (props) => <FrontendLayout {...props} /> } />
)
}

export default PublicRoute;
This code defines a PublicRoute component, which is a functional React component that is used to render a route with a specific layout. The component uses the Route component from the react-router-dom library to create a route that will render the specified layout component, passing through any props that are passed to the PublicRoute component. In this case, the FrontendLayout component will be rendered for any route that uses the PublicRoute component. This allows the developer to reuse the same layout for multiple routes, while also being able to customize the layout for individual routes if needed.
Step 11:
We can start by creating the assets file for some styling.
assets/admin/css/styles.css
.bg {

background: #00c9b7 !important;
-webkit-box-shadow: 5px 9px 43px 1px rgba(0,0,0,0.18);
box-shadow: 5px 9px 43px 1px rgba(0,0,0,0.18);
position: sticky;
top: 0px;
z-index: 10;
}
Step 12:
A Dashboard For Admin.
Let’s create a dashboard for admin as follows…
components/admin/Dashboard.js
function Dashboard() {

return (
<div>
<h1>Welcome Admin!</h1>
</div>
)
}

export default Dashboard;
This code defines a Dashboard component, which is a functional React component that returns a div containing a welcome message for an admin user. The component simply returns a div with an h1 element containing the welcome message. When this component is rendered by a React app, it will show a page with a welcome message. This component could be used as the main dashboard for an admin user, providing an overview of the app’s functionality and allowing the user to access various admin features.
Step 13:
A Navbar For Admin
Here we create a Navbar for Admin with the following code…
layouts/admin/Navbar.js
import React, {} from 'react';
import {Link, useHistory} from 'react-router-dom';
import swal from 'sweetalert';
import axios from 'axios';

function Navbar() {

const history = useHistory();

const logoutSubmit = (e) => {
e.preventDefault();

axios.post(`/api/logout`).then(res => {
if(res.data.status === 200)
{
localStorage.removeItem('auth_token');
localStorage.removeItem('auth_name');
swal("Success",res.data.message,"success");
history.push('/');
}
});
}

var AuthButtons = '';
if(!localStorage.getItem('auth_token'))
{
AuthButtons = (
<ul className="navbar-nav">

<li className="nav-item">
<Link className="nav-link" to="/login">Login</Link>
</li>
<li className="nav-item">
<Link className="nav-link" to="/register">Register</Link>
</li>
<li className="nav-item">
<Link className="nav-link" to="/contact">Contact</Link>
</li>
</ul>
);
}
else
{
AuthButtons = (
<li className="nav-item">
<li><Link className="dropdown-item" onClick={logoutSubmit}>Logout</Link></li>
</li>
);
}

return (
<nav className="navbar navbar-expand-lg navbar-light bg">
<Link className="navbar-brand ps-3" to="/admin">LOGO</Link>
<form className="d-none d-md-inline-block form-inline ms-auto me-0 me-md-3 my-2 my-md-0">
<div className="input-group">
<input className="form-control" type="text" placeholder="Search for..." aria-label="Search for..." aria-describedby="btnNavbarSearch" />
<button className="btn btn-primary" id="btnNavbarSearch" type="button"><i className="fas fa-search"></i></button>
</div>
</form>

<ul className="navbar-nav ms-auto ms-md-0 me-3 me-lg-4">
<li className="nav-item dropdown">
<Link to="#" className="nav-link dropdown-toggle" id="navbarDropdown" role="button" data-bs-toggle="dropdown" aria-expanded="false">
<i className="fas fa-user fa-fw"></i>
</Link>
<ul className="dropdown-menu dropdown-menu-end" aria-labelledby="navbarDropdown">
<li><hr className="dropdown-divider" /></li>
{AuthButtons}
</ul>
</li>
</ul>
</nav>
);
}

export default Navbar;
This code defines a Navbar component, which is a functional React component that represents a navigation bar for a web application. The component uses the Link component from the react-router-dom library to create links that can be used to navigate to different pages within the app. The component also uses the useHistory hook from react-router-dom to access the app’s history object, which is used to navigate to the home page after the user logs out.
The component also uses the axios library to make a POST request to the /api/logout endpoint, which logs the user out of the app. If the request is successful, the component removes the user’s authentication token and user name from local storage and displays a success message using the swal library.
The component then navigates to the home page. The component also includes a search form and a dropdown menu that displays different options depending on whether the user is authenticated or not. If the user is not authenticated, the dropdown menu will display links to the login, register, and contact pages. If the user is authenticated, the dropdown menu will display a link to logout. When this component is rendered by a React app, it will show a navigation bar with the specified links and options.
Step 14:
Create A MasterLayout For Admin.
This file contains the routes for the admin side and it’s as follows…
layouts/admin/MasterLayout.js
import React from 'react';
import {Switch, Route, Redirect} from 'react-router-dom';
import '../../assets/admin/css/styles.css';
import 'bootstrap/dist/js/bootstrap.bundle.js';

import Navbar from './Navbar';

import routes from '../../routes/routes';

const MasterLayout = () => {

return (
<div>

<Navbar />

<main>

<Switch>

{routes.map((route, idx) => {
return (
route.component && (
<Route
key={idx}
path={route.path}
exact={route.exact}
name={route.name}
render={(props) => (
<route.component {...props} />
)}
/>
)
)
})}
<Redirect from="/admin" to="/admin/dashboard" />
</Switch>

</main>
</div>
);

}

export default MasterLayout;
This code defines a MasterLayout component, which is a functional React component that represents the layout for a web application. The component uses the Switch and Route components from the react-router-dom library to render the appropriate route components for a given URL path. The Switch component is used to iterate over an array of route objects, which are imported from the routes/routes.js file.
For each route, the Route component is used to render the specified component for the route, passing through any props that are passed to the MasterLayout component. The Redirect component is used to redirect the user to the /admin/dashboard route if they navigate to the /admin route.
The MasterLayout component also includes the Navbar component, which is used to render the navigation bar for the app. When this component is rendered by a React app, it will show the app’s layout, including the navigation bar and the appropriate route components for the current URL path.
Step 15:
Create A Routes File For Admin
Earlier we created a file for the front end i.e the public routes file. So now we create a routes file for the admin side.
routes/routes.js
import Dashboard from '../components/admin/Dashboard';

const routes = [
{ path: '/admin', exact: true, name: 'Admin' },
{ path: '/admin/dashboard', exact: true, name: 'Dashboard', component: Dashboard },

];

export default routes;
It defines an array of route objects. Each route object has three properties: path, exact, and name. The path property specifies the URL path for the route, the exact property is a boolean value that determines whether the route should only be considered a match when the path matches exactly, and the name property is the name of the route.
The code also imports a Dashboard component from a ../components/admin/Dashboard file and specifies that it should be rendered when the /admin/dashboard route is matched. The array of route objects is then exported so that it can be used by the application to render the appropriate components for each route.
Step 16:
Admin Private Route
This file will define the permissions for accessing the admin dashboard. It checks if the person is authenticated or not. Using Laravel middleware we are able to deny access to any page.
src/AdminPrivateRoute.js
import React, {useState,useEffect} from 'react';
import {Route, Redirect, useHistory} from 'react-router-dom';
import axios from 'axios';
import MasterLayout from './layouts/admin/MasterLayout';
import swal from 'sweetalert';

function AdminPrivateRoute({...rest}) {

const history = useHistory();

const [Authenticated, setAuthenticated] = useState(false);
const [loading, setloading] = useState(true);

useEffect(() => {

axios.get(`/api/checkingAuthenticated`).then(res=> {
if(res.status === 200)
{
setAuthenticated(true);
}
setloading(false);
});

return () => {
setAuthenticated(false);
};
}, []);

axios.interceptors.response.use(undefined, function axiosRetryInterceptor(err) {
if(err.response.status === 401)
{
swal("Unauthorized", err.response.data.message,"warning");
history.push('/');
}
return Promise.reject(err);
});

axios.interceptors.response.use(function (response) {
return response;
}, function (error) {
if(error.response.status === 403) // Access Denied
{
swal("Forbidden",error.response.data.message,"warning");
history.push('/403');
}
else if(error.response.status === 404) //Page Not Found
{
swal("404","Page Not Found","warning");
history.push('/404');
}
return Promise.reject(error);
}
);

if(loading)
{
return <h1>Loading...</h1>
}

return (

<Route {...rest}
render={ ({props, location}) =>
Authenticated ?
( <MasterLayout {...props} /> ) :
( <Redirect to={{pathname: "/login", state: {from: location} }} /> )
}
/>

);
}

export default AdminPrivateRoute;
This code defines a AdminPrivateRoute component that is used to protect routes in the web application. The component is a higher-order component that takes an existing component and returns a new component that wraps it. The new component checks whether the user is authenticated before rendering the wrapped component.
The AdminPrivateRoute component uses the useState and useEffect hooks from the React library to manage its state and perform side effects. The component makes an HTTP request to the /api/checkingAuthenticated endpoint to determine whether the user is authenticated, and sets the Authenticated state variable accordingly. It also sets up an axios response interceptor that listens for HTTP 401 and 403 status codes, and displays a sweetalert message in those cases.
If the Authenticated state variable is true, the AdminPrivateRoute component will render the MasterLayout component with the supplied props. Otherwise, it will redirect the user to the /login page. The AdminPrivateRoute component also displays a “Loading…” message while it is waiting for the HTTP request to complete.
Step 17:
App.js
Update your app.js with the following code…
import React from 'react';
import {BrowserRouter as Router, Route, Redirect, Switch} from 'react-router-dom';


import MasterLayout from './layouts/admin/MasterLayout';
import Register from './components/frontend/auth/Register';
import Login from './components/frontend/auth/Login';
import AdminPrivateRoute from './AdminPrivateRoute';
import PublicRoute from './PublicRoute';


import axios from 'axios';


axios.defaults.baseURL = "http://localhost:8000";
axios.defaults.headers.post['Content-Type'] = 'application/json';
axios.defaults.headers.post['Accept'] = 'application/json';


axios.defaults.withCredentials = true;


axios.interceptors.request.use(function (config){
  const token = localStorage.getItem('auth_token');
  config.headers.Authorization = token ? `Bearer ${token}` : '';
  return config;
});

function App() {


  return (
    <div className="App">
        <Router>

          <Switch>


            <AdminPrivateRoute path="/admin" name="Admin" />

            <PublicRoute path="/" name="Home" />

             <Route path="/login">
              {localStorage.getItem('auth_token') ? <Redirect to='/' /> : <Login />}
            </Route>


            <Route path="/register">
              {localStorage.getItem('auth_token') ? <Redirect to='/' /> : <Register />}
            </Route>


            <Route path="/admin" name="Admin" render={(props) => <MasterLayout {...props} />} />


          </Switch>
        </Router>
    </div>
  );
}


export default App;
Remember to install the react-router-dom, axios. bootstrap and sweet alert using the following commands
Install react router-dom
a) npm i react-router-dom@5.2.0
Install sweet alert
a) npm install –save sweetalert
Install Axios
a) Install axios
Install Bootstrap
a) npm install bootstrap
Going To The Backend…(Using Laravel)
Step 1:
Install Laravel by running the following command…
composer create-project laravel/laravel laravelreactmultiauth-appThen begin by creating this file in API/AuthController run the following command…
php artisan make:controller API/AuthController.phpAuthController.php
<?php

namespace App\Http\Controllers\API;

use App\Models\User;
use Illuminate\Http\Request;
use App\Http\Controllers\Controller;
use Illuminate\Support\Facades\Hash;
use Illuminate\Support\Facades\Validator;


class AuthController extends Controller
{
public function register (Request $request){
$validator = Validator::make($request->all(), [
'name' => 'required|max:191',
'email' => 'required|email:191|unique:users,email',
'password' => 'required|min:8',
]);

if($validator->fails())
{
return response()->json([
'validation_errors' =>$validator->messages(),
]);
}
else
{
$user = User::create([
'name'=>$request->name,
'email'=>$request->email,
'password'=>Hash::make($request->password),
]);

$token = $user->createToken($user->email.'_Token')->plainTextToken;

return response()->json([
'status' =>200,
'username' =>$user->name,
'token' =>$token,
'message' =>'Registered Successfully',
]);
}
}

public function login (Request $request){
$validator = Validator::make($request->all(), [
'email' => 'required|email:191',
'password' => 'required',
]);

if($validator->fails())
{
return response()->json([
'validation_errors' =>$validator->messages(),
]);
}
else
{
$user = User::where('email', $request->email)->first();

if(!$user || !Hash::check($request->password,$user->password))
{
return response()->json([
'status'=>401,
'message'=>'Invalid Credentials',
]);
}
else
{
if($user->role_as == 1) //1 = admin
{
$role = 'admin';
$token = $user->createToken($user->email.'_AdminToken',['server:admin'])->plainTextToken;
}
else
{
$role = '';
$token = $user->createToken($user->email.'_Token', [''])->plainTextToken;
}
return response()->json([
'status' =>200,
'username' =>$user->name,
'token' =>$token,
'message' =>'Logged In Successfully',
'role'=>$role,
]);
}
}
}
public function logout()
{
auth()->user()->tokens()->delete();
return response()->json([
'status'=>200,
'message'=>'Logged out Successfully',
]);
}
}
This code defines a AuthController class in PHP. The class contains three methods: register, login, and logout.
The register method validates the request data using Laravel’s Validator class and creates a new User model with the supplied data if the validation is successful. It then generates an API token for the user and returns a JSON response with the user’s name, token, and a success message. If the request data is invalid, the method returns a JSON response with the validation errors.
The login method also validates the request data and attempts to find a user with the supplied email address in the database. If the user is found and the password is correct, the method generates an API token for the user and returns a JSON response with the user’s name, token, and a success message. If the user is not found or the password is incorrect, the method returns a JSON response with an error message.
The logout method deletes all the API tokens for the authenticated user and returns a JSON response with a success message.
Then we are going to install the laravel sanctum to generate the auth tokens. Run the following commands
composer require laravel/sanctumphp artisan vendor:publish --provider="Laravel\Sanctum\SanctumServiceProvider"php artisan migrateLocate your kernel.php and update it as follows…
'api' => [
\Laravel\Sanctum\Http\Middleware\EnsureFrontendRequestsAreStateful::class,
'throttle:api',
\Illuminate\Routing\Middleware\SubstituteBindings::class,
],
Step 2:
Create A Middleware For Admin and User
Create a middleware as follows by running the following command
php artisan make middleware:ApiAdminMiddlewareApiAdminMiddleware.php
<?php

namespace App\Http\Middleware;

use Closure;
use Illuminate\Http\Request;
use Illuminate\Support\Facades\Auth;

class ApiAdminMiddleware
{
/**
* Handle an incoming request.
*
* @param \Illuminate\Http\Request $request
* @param \Closure(\Illuminate\Http\Request): (\Illuminate\Http\Response|\Illuminate\Http\RedirectResponse) $next
* @return \Illuminate\Http\Response|\Illuminate\Http\RedirectResponse
*/
public function handle(Request $request, Closure $next)
{
if(Auth::check())
{
if(auth()->user()->tokenCan('server:admin'))
{
return $next($request);
}
else{
return response()->json([
'message'=> 'Forbidden!',
], 403);
}
}
else
{
return response()->json([
'status'=>401,
'message'=>'Please Login First',
]);
}
}
}
This code defines an ApiAdminMiddleware class in PHP. The class contains a single handle method that acts as a middleware for handling incoming HTTP requests.
The handle method checks whether the user is authenticated using Laravel’s Auth facade. If the user is authenticated, it checks whether the user’s API token has the server:admin scope. If the user has the server:admin scope, the method calls the $next closure with the request and returns the response. If the user does not have the server:admin scope, the method returns a JSON response with a “Forbidden!” message.
If the user is not authenticated, the method returns a JSON response with a “Please Login First” message. This middleware can be used to protect routes that require the server:admin scope for access.
Update your kernel.php with the line of code on the…
protected $routeMiddleware = [

'isAPIAdmin' => \App\Http\Middleware\ApiAdminMiddleware::class,

];
Step 3:
Create the API Routes
Within the api.php update it as follows…
api.php
Route::post('register', [AuthController::class, 'register']);
Route::post('login', [AuthController::class, 'login']);

Route::middleware(['auth:sanctum', 'isAPIAdmin'])->group(function() {
Route::get('/checkingAuthenticated', function(){
return response()->json(['message'=>'You are in', 'status'=>200], 200);
});

});

Route::middleware(['auth:sanctum'])->group(function() {
Route::post('logout', [AuthController::class, 'logout']);

});

Route::get('dashboard', [UserController::class, 'index']);
This code defines routes for an API built with Laravel. The routes are defined in the api.php file and use Laravel’s built-in route groups to apply middleware to multiple routes at once.
The first route group applies the auth:sanctum and isAPIAdmin middleware to a group of routes. The auth:sanctum middleware is a built-in Laravel middleware that authenticates requests using Laravel’s “sanctum” (previously known as “laravel passport”) package, which provides a simple way to authenticate API requests using tokens. The isAPIAdmin middleware is a custom middleware that checks whether the authenticated user has the server:admin scope on their API token.
The group of routes in this first route group includes a POST route for the register action of the AuthController class and a POST route for the login action of the AuthController class. It also includes a GET route that returns a JSON response with a “You are in” message if the user is authenticated and has the server:admin scope.
The second route group applies the auth:sanctum middleware to a group of routes. This group of routes includes a POST route for the logout action of the AuthController class.
The last route is a GET route for the index action of the UserController class. This route is not within a route group and does not have any middleware applied to it.
Step 4:
Create A Controller For The Normal User
API/UserController.php
<?php

namespace App\Http\Controllers\API;

use Illuminate\Http\Request;
use App\Http\Controllers\Controller;
use Illuminate\Foundation\Auth\User;

class UserController extends Controller
{
public function index (Request $request)
{
$users = User::all();
return response()->json([
'status'=> 200,
'users'=>$users,
]);
}
}
Step 5:
Update the Users Table
Go to the users’ table and update it as follows. Add a column with the title as role_as set 0=users and 1=admin

When all goes well you should get this output…

Dear Web Dev Trainee!
I’ve followed your steps in the “Laravel multi authentication” project, but it throws me errors, such as “Multiple CORS header ‘Access-Control-Allow-Origin’ not allowed”, and the navigation in React doesn’t work. Can you please share with me the working project you made? I would really appreciate it! Thank you in advance!
Peter
Have you tried using (https://mybrowseraddon.com/access-control-allow-origin.html) it’s in chrome extension.